Tubby Custard Recipe: A Mind-Blowing Delight You Must Try
Have you ever wondered how to make the famous tubby custard recipe from the beloved Teletubbies show? You’re in for a treat! This tubby custard recipe will blow your mind with its delightful taste and simple preparation. Perfect for kids and adults alike, it’s a nostalgic dessert that brings joy to everyone.
In this recipe:
- Simple ingredients
- Easy-to-follow steps
- Tips for perfect custard
Ready to dive in? Let’s start making this delightful tubby custard. The ingredients are basic and the steps are straightforward, ensuring anyone can whip this up. If you love making sweet treats at home, don’t miss our Chick Fil A Ice Cream Recipe and the sensational Honey Bun Cheesecake Recipe. Both are guaranteed to satisfy your sweet tooth.
To begin, gather your ingredients and follow each step closely. This way, you’ll achieve the perfect custard consistency. Remember, the key is constant whisking over low heat to avoid any lumps. So, let’s get started on making this iconic tubby custard that’s sure to impress!

Who Can Make This Recipe and What You Need
This tubby custard recipe is ideal for everyone—parents, kids, and nostalgic adults. Whether you’re a cooking novice or a seasoned home chef, you can make tubby custard at home with ease. The recipe is designed to be simple, making it perfect for beginners. So, if you’re wondering about the tubby custard making process, rest assured, it’s straightforward and requires minimal effort.
Minimal Equipment Required
One of the best parts of this tubby custard for beginners is that it doesn’t require fancy kitchen tools. Here’s what you’ll need:
- Medium saucepan
- Whisk (hand or electric)
- Fine-mesh strainer
- Measuring cups and spoons
With just these basic kitchen items, you’re all set to start the tubby custard making process. Plus, the ingredients are simple and likely already in your pantry. This recipe is not only easy to follow but also requires very few ingredients, making it budget-friendly.
Feeling ready to dive into the tubby custard world? If you want more detailed instructions, check out Julia’s Plate for a step-by-step guide. Now, gather your equipment, follow the steps, and enjoy making tubby custard at home. It’s a delightful treat that brings joy to both the young and the young at heart!
Ingredients Needed for Tubby Custard
Now that we’ve covered the minimal equipment required, let’s dive into the specifics of the ingredients needed for this delightful dessert. Choosing the best ingredients for Tubby Custard is crucial to achieving that perfect, creamy texture and signature pink color that everyone loves. Ready to gather your Tubby Custard ingredients? Let’s get started!
Essential Ingredients for the Perfect Tubby Custard
Here’s what you need to make the best Tubby Custard:
- 1 cup (200ml) whole milk: The richness of whole milk gives the custard its creamy base.
- 1/2 cup (100g) granulated sugar: This adds the right amount of sweetness to balance the flavors.
- 1/4 teaspoon salt: A pinch of salt highlights and enhances the overall taste of the custard.
These simple ingredients come together to create a delicious and nostalgic treat. The whole milk provides a rich and creamy texture, while the granulated sugar adds just the right amount of sweetness. Don’t overlook the salt—this small amount plays a big role in bringing out the flavors of the Tubby Custard.
Ready to get started on making this delightful dessert? Gather your ingredients, and let’s move on to the next step!

Step-by-Step Guide to Making Tubby Custard
Now that you have gathered all the necessary ingredients, it’s time to dive into the tubby custard making process. Follow these simple ways to make tubby custard at home, and you’ll be delighted with the results. Ready to get started? Let’s go!
- Combine the Ingredients: In a medium saucepan, mix together 1 cup of whole milk, 1/2 cup of granulated sugar, and 1/4 teaspoon of salt. Heat the mixture over medium heat until it is hot but not boiling. Stir occasionally to ensure the sugar dissolves completely.
- Prepare the Egg Mixture: While the milk mixture is heating, take a small bowl and whisk together 2 large egg yolks and 1/2 teaspoon of vanilla extract. This step helps to blend the flavors and ensures a smooth consistency for your custard.
- Combine the Mixtures:
Gradually Combine to Prevent Scrambling
Slowly pour the hot milk mixture into the egg yolks while whisking constantly. This technique prevents the eggs from scrambling and ensures a smooth, velvety texture. Whisking continuously is crucial for the perfect tubby custard making process.
- Thicken the Custard: Return the combined mixture to the saucepan and cook over low heat. Keep whisking constantly until the custard thickens and coats the back of a spoon, which should take about 10-12 minutes. This step is essential for the right consistency.
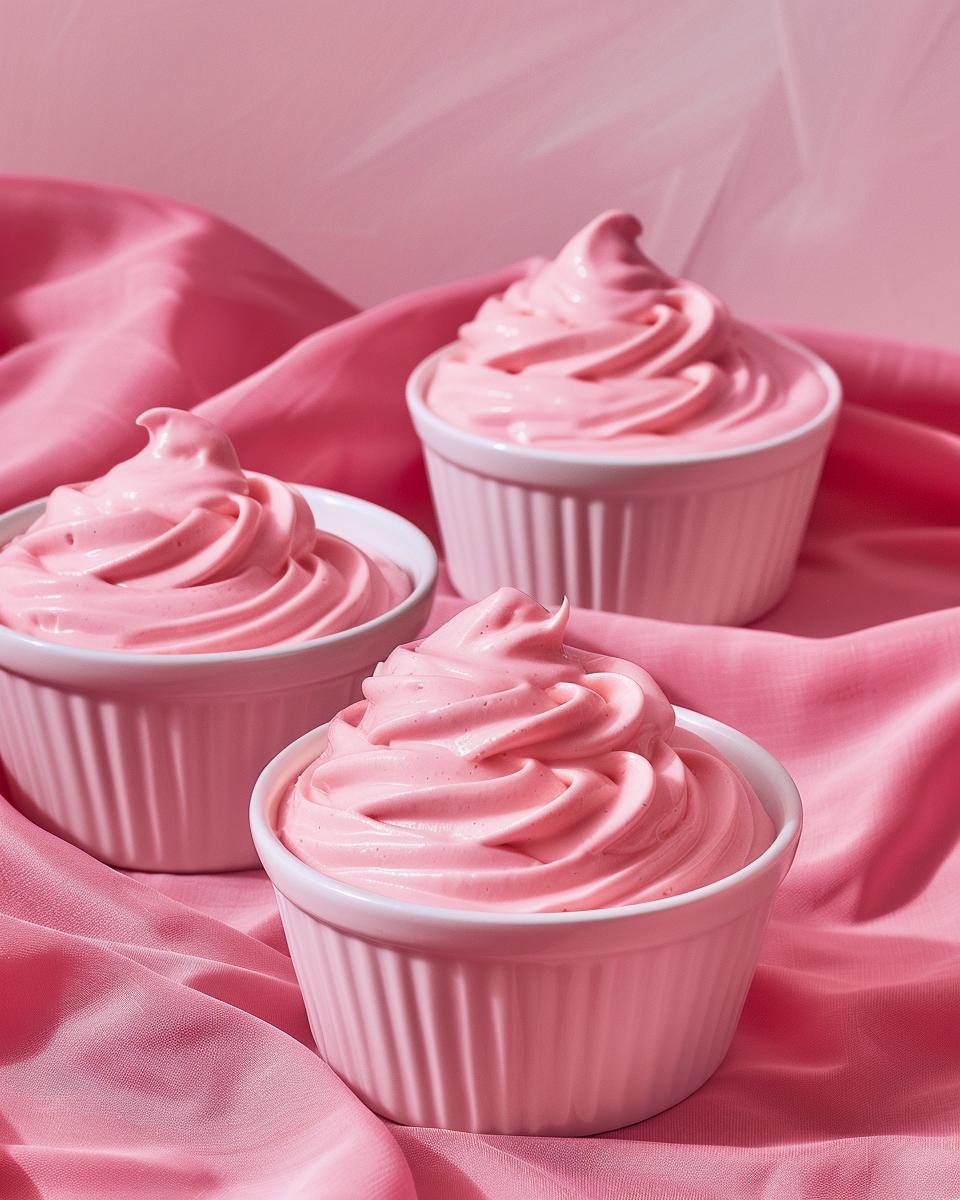
- Add the Signature Color: Remove the saucepan from the heat and stir in 1/4 teaspoon of red food coloring for that iconic pink hue. This step is optional, but it truly makes your own tubby custard look authentic.
- Strain and Cool: Pour the custard through a fine-mesh strainer into a clean glass or ceramic bowl to remove any egg solids. Allow the custard to cool to room temperature, then cover it and refrigerate for at least 2 hours or overnight for the best results.
And that’s it! You’ve just learned how to prepare tubby custard with ease. Enjoy your delicious homemade treat, and don’t forget to share it with friends and family!
Serving and Storing Ideas and Tips
Now that you’ve mastered the art of making Tubby Custard, let’s talk about how to serve and store your delightful creation. This recipe is simple and accessible for all levels, making it easy to enjoy at any time.
Serving Tubby Custard
When it comes to serving Tubby Custard, the possibilities are endless! Serve it chilled in small bowls, garnished with a dollop of whipped cream or a sprinkle of sugar. For a fun twist, add some fresh berries or a drizzle of honey.
Have you ever thought about using Tubby Custard as a topping? It’s perfect over pancakes, waffles, or even a slice of warm pie. If you’re planning to serve Tubby Custard on special occasions, consider layering it in a trifle with sponge cake and fruit for an impressive dessert.
Hosting a party? Serve Tubby Custard in small, individual cups for a delightful treat that’s both nostalgic and delicious. Your guests will love the playful nod to their childhood.
Storing Tubby Custard
Proper storage is key to maintaining the custard’s creamy texture. Here are some tubby custard storage tips:
- Allow the custard to cool to room temperature before storing.
- Transfer it to an airtight container to keep it fresh.
- Refrigerate the custard for up to 3 days. It’s best enjoyed fresh, but it will still be delicious after a few days.
If you plan to make the custard ahead of time, prepare it the day before and store it in the fridge. Just give it a good stir before serving to ensure it’s smooth and creamy.
Now you’re all set to enjoy your Tubby Custard! Whether you’re serving it at a family gathering or storing it for a mid-week treat, these custard serving ideas and tubby custard storage tips will help you make the most of this delightful dessert.

Pro Tips for Perfect Tubby Custard
- Always whisk constantly to prevent lumps.
- For a thicker custard, cook a few extra minutes.
- Use a fine-mesh strainer for a smooth texture.
- To avoid scrambling eggs, pour milk slowly.
- Experiment with different extracts for unique flavors.
- For a vibrant color, use gel food coloring.
- Cool custard at room temperature before refrigerating.
- Serve tubby custard recipe fresh for best flavor.
FAQ and Tips
Got questions about making Tubby Custard? We’ve got answers! Below are some of the most frequently asked questions along with handy tips to ensure your custard turns out perfect every time.
Tubby Custard Ingredient Replacement Options
Q: Can I use non-dairy milk alternatives for Tubby Custard?
A: Yes, you can use non-dairy milk alternatives like almond milk or soy milk. However, keep in mind that this might slightly change the flavor and texture of your custard. Non-dairy milks are generally thinner and less creamy, which could result in a less rich custard.
Q: What can I use instead of red food coloring?
A: If you prefer not to use artificial coloring, you can opt for natural alternatives such as beet juice or a few drops of pomegranate juice. These options will give your custard a beautiful pink hue without the need for synthetic colors.
Money-Saving Tips for Tubby Custard
Q: How can I make Tubby Custard on a budget?
A: One way to save money is by using basic pantry staples. Whole milk, sugar, and eggs are usually affordable and readily available. You can also skip the red food coloring if you’re looking to cut costs further.
Q: Can I prepare Tubby Custard in advance?
A: Yes, you can prepare the custard a day in advance. However, it’s best served fresh to retain its creamy texture and delightful flavor. If you do make it ahead, make sure to store it in an airtight container in the refrigerator.
Tubby Custard Creation Tips
Q: Why is the custard pink, and is it necessary?
A: The pink color is a nod to the Teletubbies’ iconic Tubby Custard. While red food coloring is optional, it adds the signature pink color that makes the custard fun and visually appealing, especially for kids.
Q: How can I ensure my custard turns out smooth and creamy?
A: To ensure a smooth and creamy custard, cook it over low heat and whisk constantly. This prevents the eggs from curdling. Straining the finished custard through a fine-mesh strainer will also help remove any lumps, resulting in a perfectly silky texture.
For more detailed instructions and tips, you can check out this Tubby Custard Recipe from Julia’s Plate.